“”
1. 前言
1.1 什么是软件测试
- 用来确认一个程序的品质或性能是否符合开发之前所提出的一些要求。
- 软件测试就是在软件投入运行前,对软件需求分析、设计规格说明和编码的最终复审,是软件质量保证的关键步骤。
- 软件测试是为了发现错误而执行程序的过程。
1.2 软件测试的目的
- 测试可以确保得到预期的结果
- 作为现有代码行为的描述
- 促使开发者写可测试的代码,一般可测试的代码可读性也会高一点
- 如果依赖的组件有修改,受影响的组件能在测试中发现错误
1.3 测试的类型
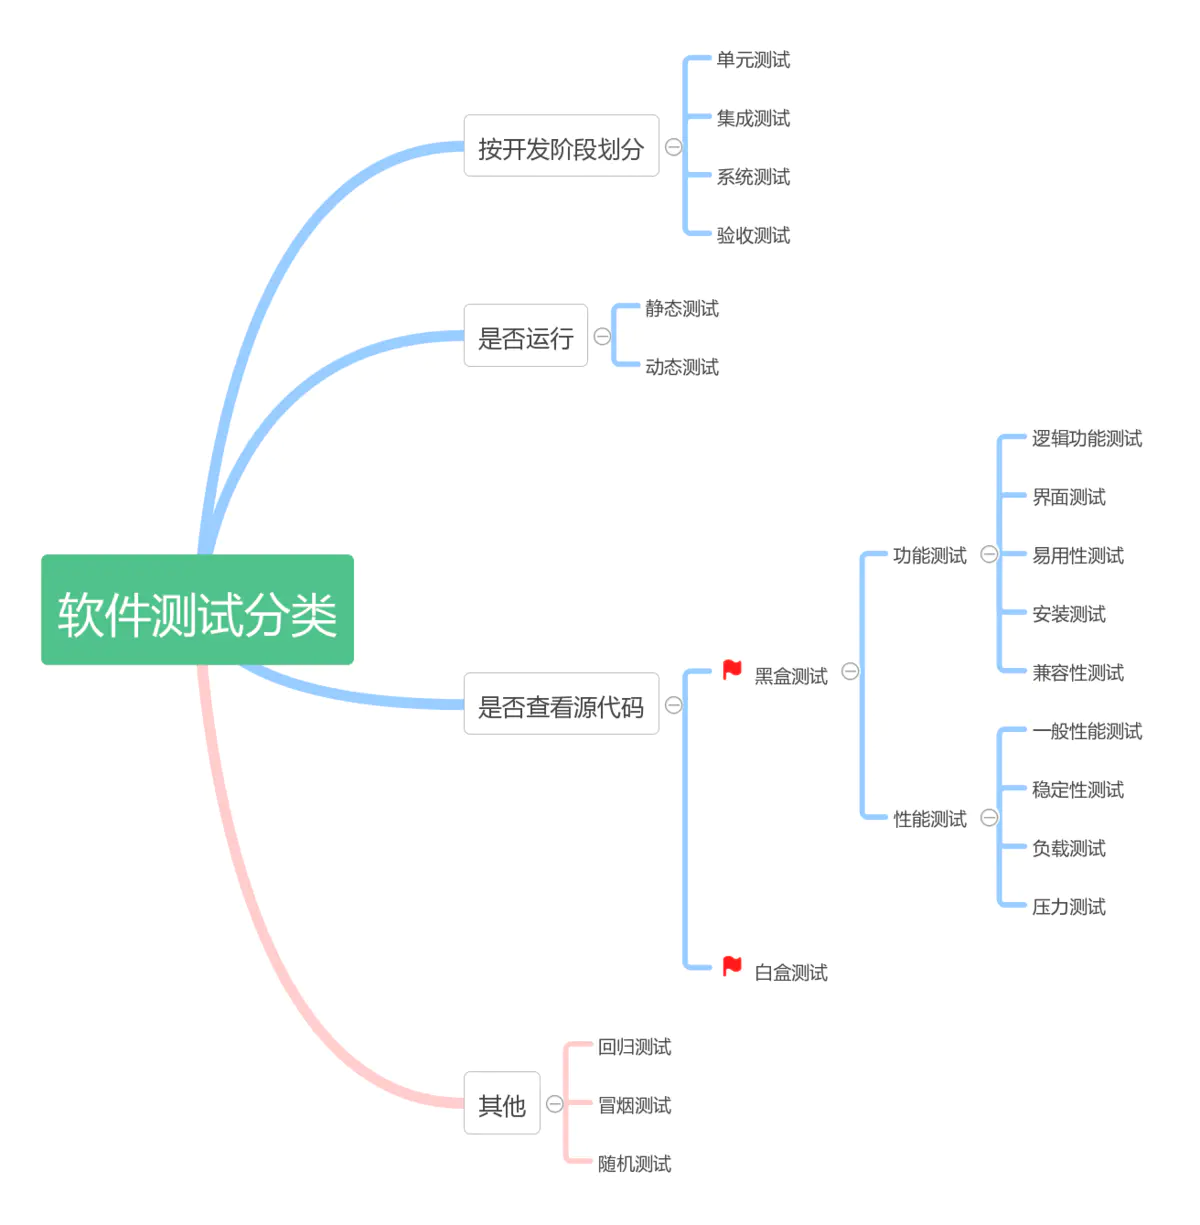
单元测试 指的是以原件的单元为单位,对软件进行测试。单元可以是一个函数,也可以是一个模块或一个组件,基本特征就是只要输入不变,必定返回同样的输出。一个软件越容易些单元测试,就表明它的模块化结构越好,给模块之间的耦合越弱。React的组件化和函数式编程,天生适合进行单元测试。
1.4 开发模式
- TDD:测试驱动开发(Testing Driven Development),强调的是一种开发方式,以测试来驱动整个项目,即先根据接口完成测试编写,然后在完成功能是要不断通过测试,最终目的是通过所有测试。
- BDD:行为驱动测试(Behavior Driven Development),强调的是写测试的风格,即测试要写的像自然语言,让项目的各个成员甚至产品都能看懂测试,甚至编写测试。
TDD和BDD有各自的使用场景,BDD一般偏向于系统功能和业务逻辑的自动化测试设计;而TDD在快速开发并测试功能模块的过程中则更加高效,以快速完成开发为目的。
2. 技术选型:Jest + Enzyme
2.1 Jest
Jest是Facebook开源的一个前端测试框架,主要用于React和React Native的单元测试,已被集成在create-react-app中。Jest特点:
- 易用性:基于Jasmine,提供断言库,支持多种测试风格。
- 适应性:Jest是模块化、可扩展和可配置的。
- 沙箱和快照:Jest内置了JSDOM,能够模拟浏览器环境,并且并行执行。
- 快照测试:Jest能够对React组件树进行序列化,生成对应的字符串快照,通过比较字符串提供高性能的UI检测。
- Mock系统:Jest实现了一个强大的Mock系统,支持自动和手动mock。
- 支持异步代码测试:支持Promise和async/await。
- 自动生成静态分析结果:内置Istanbul,测试代码覆盖率,并生成对应的报告。
2.2 Enzyme
Enzyme是Airbnb开源的React测试工具库库,它功能过对官方的测试工具库ReactTestUtils的二次封装,提供了一套简洁强大的 API,并内置Cheerio。
Enzyme实现了jQuery风格的方式进行DOM 处理,开发体验十分友好。在开源社区有超高人气,同时也获得了React 官方的推荐。
3. 测试环境搭建
安装jest、enzyme,项目根目录新建文件jest.config.js进行jest测试规则的配置,更多配置规则请参考jest官网详细配置规则。
const path = require("path");
module.exports = {
    // 单元测试环境根目录
    rootDir: path.resolve(__dirname),
    // 指定需要进行单元测试的文件匹配规则
    testMatch: ["<rootDir>/test/**/__test__/*.js"],
    // 用正则来匹配不用测试的文件
    testPathIgnorePatterns: ["/node/modules"],
    testURL: "http://localhost/",
    // 是否生成测试覆盖报告,如果开启,会增加测试的时间
    collectCoverage: true,
    // 生成的测试报告路径
    coverageDirectory: "./coverage",
    // 代表支持加载的文件名
    moduleFileExtensions: ["js", "jsx"],
    // 代表需要被Mock的资源名称
    moduleNameMapper: {
        "\\.(css|less)$": "identity-obj-proxy"
    },
    transform: {
        "^.+\\.js$": "babel-jest",
        "\\.(jpg|jpeg|png|gif|eot|otf|webp|svg|ttf|woff|woff2|mp4|webm|wav|mp3|m4a|aac|oga)$":
			"<rootDir>/fileTransformer.js"
    },
    transformIgnorePatterns: ["<rootDir>/node_modules/(?!(lodash-es|other-es-lib))"]
};
写好jest配置文件之后,需要在package.json中定义test命令,在scripts中新增"test": "jest --config ./jest.config.js" 随即便可在当前项目下命令行使用npm run test执行测试代码。
值得注意的是需要安装包identity-obj-proxy对样式文件进行模拟,安装包babel-jest处理我们书写的测试代码中的ES6+语法。transform中的静态文件处理函数如下:
// fileTransformer.js
const path = require("path");
module.exports = {
    process(src, filename, config, options) {
        return "module.exports = " + JSON.stringify(path.basename(filename)) + ";";
    }
};
如果React的版本是15或者16,需要安装对应的enzyme-adapter-react-15和enzyme-adapter-react-16并在测试代码中配置。
import Enzyme from 'enzyme';
import Adapter from 'enzyme-adapter-react-16';

Enzyme.configure({ adapter: new Adapter() });
同时我们需要在根目录新建.babelrc对babel进行配置,此过程中需要安装@babel/plugin-proposal-class-properties、@babel/cli、@babel/core、@babel/plugin-transform-runtime、@babel/preset-env、@babel/preset-react
{
  "presets": ["@babel/preset-env", "@babel/preset-react"],
  "plugins": [
    "@babel/plugin-transform-runtime",
    "@babel/plugin-proposal-class-properties"
  ]
}
4. Jest
4.1 globals api
- describe(name, fn):描述块,讲一组功能相关的测试用例组合在一起。
- it(name, fn, timeout):别名test,用来放测试用例。
- afterAll(fn, timeout):所有测试用例跑完以后执行的方法。
- beforeAll(fn, timeout):所有测试用例执行之前执行的方法。
- afterEach(fn):在每个测试用例执行完后执行的方法。
- beforeEach(fn):在每个测试用例执行之前需要执行的方法。
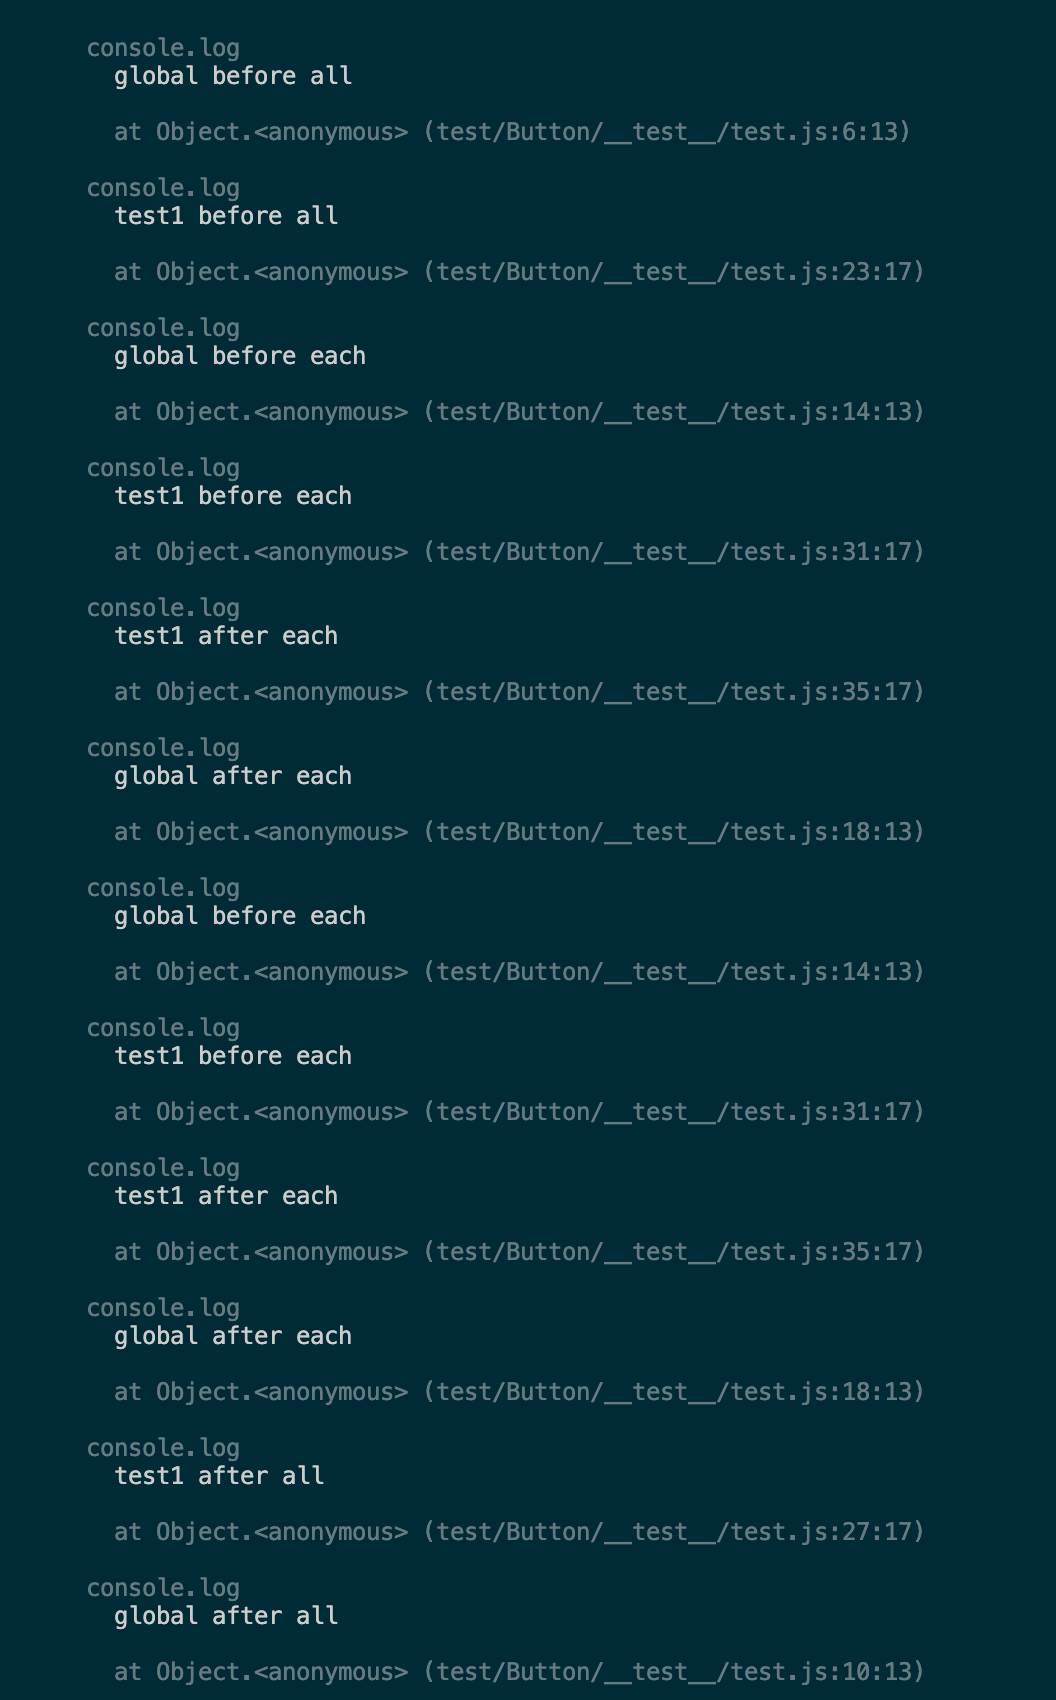
全局和describe都可以有上面四个周期函数,describe的after函数优先级要高于全局的after函数,describe的before函数优先级要低于全局的before函数。
beforeAll(() => {
  console.log('global before all');
});

afterAll(() => {
  console.log('global after all');
});

beforeEach(() =>{
  console.log('global before each');
});

afterEach(() => {
  console.log('global after each');
});

describe('test1', () => {
  beforeAll(() => {
    console.log('test1 before all');
  });

  afterAll(() => {
    console.log('test1 after all');
  });

  beforeEach(() => {
    console.log('test1 before each');
  });

  afterEach(() => {
    console.log('test1 after each');
  });

  it('test sum', () => {
    expect(sum(2, 3)).toEqual(5);
  });

  it('test mutil', () => {
    expect(sum(2, 3)).toEqual(7);
  });

});
4.2 config
Jest拥有丰富的配置项,可以写在package.json里增加增加jest字段来进行配置,或者通过命令行–config来指定配置文件。
4.3 jest对象
- jest.fn(implementation):返回一个全新没有使用过的mock function,这个function在被调用的时候会记录很多和函数调用有关的信息
- jest.mock(moduleName, factory, options):用来mock一些模块或者文件
- jest.spyOn(object, methodName):返回一个mock function,和jest.fn相似,但是能够追踪object[methodName]的调用信息,类似Sinon
4.4 Mock Functions
使用mock函数可以轻松的模拟代码之间的依赖,可以通过fn或spyOn来mock某个具体的函数;通过mock来模拟某个模块。具体的API可以看mock-function-api。
4.5 快照
快照会生成一个组件的UI结构,并用字符串的形式存放在__snapshots__文件里,通过比较两个字符串来判断UI是否改变,因为是字符串比较,所以性能很高。
要使用快照功能,需要引入react-test-renderer库,使用其中的renderer方法,jest在执行的时候如果发现toMatchSnapshot方法,会在同级目录下生成一个__snapshots文件夹用来存放快照文件,以后每次测试的时候都会和第一次生成的快照进行比较。可以使用jest --updateSnapshot来更新快照文件。
4.5 异步测试
Jest支持对异步的测试,支持Promise和Async/Await两种方式的异步测试。
4.6 常见断言
- expect(value):要测试一个值进行断言的时候,要使用expect对值进行包裹
- toBe(value):使用Object.is来进行比较,如果进行浮点数的比较,要使用toBeCloseTo
- not:用来取反
- toEqual(value):用于对象的深比较
- toMatch(regexpOrString):用来检查字符串是否匹配,可以是正则表达式或者字符串
- toContain(item):用来判断item是否在一个数组中,也可以用于字符串的判断
- toBeNull(value):只匹配null
- toBeUndefined(value):只匹配undefined
- toBeDefined(value):与toBeUndefined相反
- toBeTruthy(value):匹配任何使if语句为真的值
- toBeFalsy(value):匹配任何使if语句为假的值
- toBeGreaterThan(number): 大于
- toBeGreaterThanOrEqual(number):大于等于
- toBeLessThan(number):小于
- toBeLessThanOrEqual(number):小于等于
- toBeInstanceOf(class):判断是不是class的实例
- anything(value):匹配除了null和undefined以外的所有值
- resolves:用来取出promise为fulfilled时包裹的值,支持链式调用
- rejects:用来取出promise为rejected时包裹的值,支持链式调用
- toHaveBeenCalled():用来判断mock function是否被调用过
- toHaveBeenCalledTimes(number):用来判断mock function被调用的次数
- assertions(number):验证在一个测试用例中有number个断言被调用
- extend(matchers):自定义一些断言
5. Enzyme
5.1 三种渲染方法
shallow:浅渲染,是对官方的Shallow Renderer的封装。将组件渲染成虚拟DOM对象,只会渲染第一层,子组件将不会被渲染出来,使得效率非常高。不需要DOM环境, 并可以使用jQuery的方式访问组件的信息render:静态渲染,它将React组件渲染成静态的HTML字符串,然后使用Cheerio这个库解析这段字符串,并返回一个Cheerio的实例对象,可以用来分析组件的html结构mount:完全渲染,它将组件渲染加载成一个真实的DOM节点,用来测试DOM API的交互和组件的生命周期。用到了jsdom来模拟浏览器环境
三种方法中,shallow和mount因为返回的是DOM对象,可以用simulate进行交互模拟,而render方法不可以。一般shallow方法就可以满足需求,如果需要对子组件进行判断,需要使用render,如果需要测试组件的生命周期,需要使用mount方法。
5.2 常用方法
- simulate(event, mock):模拟事件,用来触发事件,event为事件名称,mock为一个event object
- instance():返回组件的实例
- find(selector):根据选择器查找节点,selector可以是CSS中的选择器,或者是组件的构造函数,组件的display name等
- at(index):返回一个渲染过的对象
- get(index):返回一个react node,要测试它,需要重新渲染
- contains(nodeOrNodes):当前对象是否包含参数重点 node,参数类型为react对象或对象数组
- text():返回当前组件的文本内容
- html(): 返回当前组件的HTML代码形式
- props():返回根组件的所有属性
- prop(key):返回根组件的指定属性
- state():返回根组件的状态
- setState(nextState):设置根组件的状态
- setProps(nextProps):设置根组件的属性
6. 编写测试代码
6.1 使用 snapshot 进行 UI 测试
-
组件代码(用于6.1、6.2)
import React from "react"; import "./index.less"; const Button = props => { const { className, onClick, children, size, type, style } = props; return ( <div style={style} className={`custom-button ${size} ${className} ${type}`} onClick={onClick} > {Array.isArray(children) ? children.map(item => item) : children} </div> ); }; Button.defaultProps = { className: "", size: "middle", onClick: () => {}, type: "", style: {} }; export default Button; -
测试
it("renders correctly", () => {
    const tree = render(<Button />);
    expect(tree).toMatchSnapshot();
});
当使用toMatchSnapshot的时候,会生成一份组件DOM的快照,以后每次运行测试用例的时候,都会生成一份组件快照和第一次生成的快照进行对比,如果对组件的结构进行修改,那么生成的快照就会对比失败。可以通过更新快照重新进行UI测试。
6.2 对组件节点进行测试
it("should has span", () => {
    const wrapper = shallow(
        <Button>
            <span className="icon" />
            <span>{"按钮"}</span>
        </Button>
    );
    expect(wrapper.find("span").length).toBe(2);
});
it("should onClick be called", () => {
    const onClick = jest.fn();
    const wrapper = mount(<Button onClick={onClick} />);
    wrapper.find(".custom-button").simulate("click");
    expect(onClick).toBeCalled();
});
it("should button text match the list", () => {
    const wrapper = mount(
        <Button>
            <span className="icon" />
            <span>{"按钮"}</span>
        </Button>
    );
    wrapper.find("span").forEach((node, index) => {
        expect(node.text()).toBe(["", "按钮"][index]);
    });
});
判断组件是否有span这个元素,使用shallow方法进行组件的渲染,我们传入了两个span分别表示组件的图标和文字,所以预期应该有两个span元素。
因为在组件内部onClick事件是绑定在最外层容器的,这个容器有一个固定的样式名称.custom-button,所以我们根据这个样式名称去选中节点,使用simulate模拟一个点击事件,最后判断传入的事件是否被调用即可。
判断组件的内容实用mount方法对组件进行渲染,然后使用forEach方法判断得到的内容是否和传入的值相等。
6.3 测试组件内部函数和state
-
类组件
-
类组件代码
import React from "react"; export default class Test extends React.Component { state = { count: 0 }; componentDidMount() {} inc = () => { this.setState({ count: this.state.count + 1 }); }; render() { const { count } = this.state; return <div>{count}</div>; } } -
测试
我们通过instance可以拿到组件内部的方法或者状态
it("calls component inc", () => {
    const wrapper = shallow(<Test />);
    const spyFunction = jest.spyOn(wrapper.instance(), "inc");
    wrapper.instance().inc();
    expect(spyFunction).toHaveBeenCalled();
    // 查看state的变化
    expect(wrapper.instance().state.count).toBe(1);
    // 查看页面的变化
  	expect(wrapper.find("div").text()).toBe("1");
    spyFunction.mockRestore();
});
使用instance函数来取得组件的实例,并用spyOn方法来mock实例上的内部方法,然后用这个实例去调用那个内部方法,就可以用替身来判断这个内部函数是否被调用。如果内部方法是用箭头函数来定义的时候,需要对实例进行mock;如果内部方法是通过正常的方式或者bind的方式定义的,那么需要对组件的prototype进行mock。其实对生命周期或者内部函数的测试,可以通过一些state的改变进行判断,因为这些函数的调用一般都会对组件的state进行一些操作。
-
-
hooks组件
-
hooks组件代码
import React from 'react'; export default function Login(props) { const { email: propsEmail, password: propsPassword, dispatch } = props; const [isLoginDisabled, setIsLoginDisabled] = React.useState(true); const [email, setEmail] = React.useState(propsEmail || ''); const [password, setPassword] = React.useState(propsPassword || ''); React.useEffect(() => { validateForm(); }, [email, password]); const validateEmail = text => /@/.test(text); const validateForm = () => { setIsLoginDisabled(password.length < 8 || !validateEmail(email)); }; const handleEmailBlur = evt => { const emailValue = evt.target.value.trim(); setEmail(emailValue); }; const handlePasswordChange = evt => { const passwordValue = evt.target.value.trim(); setPassword(passwordValue); }; const handleSubmit = () => { dispatch('submit(email, password)'); setIsLoginDisabled(true); }; return ( <form> <input type="email" placeholder="email" className="mx-auto my-2" onBlur={handleEmailBlur} /> <input type="password" className="my-2" onChange={handlePasswordChange} value={password} /> <input type="button" className="btn btn-primary" onClick={handleSubmit} disabled={isLoginDisabled} value="Submit" /> </form> ); } -
测试state的更新
对于类组件我们知道了可以使用instance().state来获取组件的state,从而知晓其更新情况。但是对于hooks组件来说,state在函数内部不能导出,无法直接测试。为了测试 state 是否有更新,我们可以 simulate 事件或者调用组件的属性方法,来检测 state 是否有更新并正确的渲染组件。
const container = shallow(<Login />);
it('should set the password value on change event with trim', () => {
    container.find('input[type="password"]').simulate('change', {
      target: {
        value: 'somenewpassword  ',
      },
    });
    expect(container.find('input[type="password"]').prop('value')).toEqual(
      'somenewpassword',
    );
});

it('should call the dispatch function and disable the submit button on button click', () => {
    container.find('input[type="button"]').simulate('click');
    expect(
      container.find('input[type="button"]').prop('disabled'),
    ).toBeTruthy();
    expect(initialProps.dispatch).toHaveBeenCalledTimes(1);
});
替代 simulate 的另外一方法是:可以通过调用挂载在 prop 上的方法,并传递必要的参数。
container.find('input[type="password"]').prop('onChange')({
    target: {
        value: 'somenewpassword',
    },
});
这种方法常常用于测试自定义组件上面的方法,例如:
<Dropdown onDropdownClose={onDropdownClose} />container.find("Dropdown").prop("onDropdownClose")(/* params */) -
测试那些不更新 state 的方法
那些不需要维护 state 的方法可以重构从组件内部抽离放在单独文件中,单独测试这些功能函数,而不是在组件内部测试它们。如果,这个方法对组件非常特别,并不能提取到外面,我们也可以把它们跟组件放在同个一个文件中,但是,不要放在组件内部。为了使函数标准化,我们可以把它们抽象单一的方法。
export const LoginMethods = () => {
  const isEmailValid = text => /@/.test(text);
  const isPasswordValid = password => password.length >= 8;
  const areFormFieldsValid = (email, password) =>
    isEmailValid(email) && isPasswordValid(password);
  return {
    isEmailValid,
    isPasswordValid,
    areFormFieldsValid,
  };
};

export default function Login(props) {
  /* useState declarations unchanged */

  React.useLayoutEffect(() => {
    setIsLoginDisabled(!LoginMethods().areFormFieldsValid(email, password));
  }, [email, password]);

};
这时,测试它们就非常的直接了。
describe('LoginMethods()', () => { it('isEmailValid should return false if email is invalid', () => { expect(LoginMethods().isEmailValid('notvalidemail')).toBeFalsy(); expect(LoginMethods().isEmailValid('notvalidemail.aswell')).toBeFalsy(); }); it('isEmailValid should return false if email is valid', () => { expect(LoginMethods().isEmailValid('validemail@gmail.com')).toBeTruthy(); }); /* Similar for isPasswordValid and areFormFieldsValid */ }); -
测试不可控组件
如何测试不可控组件呢?由于,email input 是不可控的,它的 state 并不会受组件内部控制。如果,给组件设置一个 value 属性,我将会得到一个错误提示:onChange 是必须的,否则,组件将会变成一个只读的可控组件,并不能输入任何值。因此,为了在不设置 value 的情况下测试组件,我们将会把 email 的 state 赋值给 data-value 属性。
<input type="email" placeholder="email" className="mx-auto my-2" onBlur={handleEmailBlur} data-value={email} /> 把 value 赋值给 data-value 后,我们就可以像可控组件一样通过模拟事件来测试,然后,检查一下 data-value 是否正确。
it('should set the email data value prop', () => { container.find('input[type="email"]').simulate('blur', { target: { value: 'email@gmail.com', }, }); expect(container.find('input[type="email"]').prop('data-value')).toEqual( 'email@gmail.com', ); }); -
重构无状态组件和自定义 Hook
为了减少不可控组件的相关问题,有一个实现上的建议,就是把 state 和生命周期相关的 hooks 抽离真实的组件,然后把它们作为自定义 hook来测试。
把 hook 抽离到一个单独方法中,并返回一个对象,然后,通过自定义 hook 把对象注入到函数组件中。通过这种实现后,函数组件被拆分成了一个自定义 hook 和一个无状态组件。通过注入自定义组件让无状态组件变得有状态。
import React from 'react'; export const LoginMethods = () => { /* Same as before */ }; export const useLoginElements = props => { const { email: propsEmail, password: propsPassword, dispatch } = props; const [isLoginDisabled, setIsLoginDisabled] = React.useState(true); const [email, setEmail] = React.useState(propsEmail || ''); const [password, setPassword] = React.useState(propsPassword || ''); React.useEffect(() => { setIsLoginDisabled(!LoginMethods().areFormFieldsValid(email, password)); }, [email, password]); const handleEmailBlur = evt => { const emailValue = evt.target.value.trim(); setEmail(emailValue); }; const handlePasswordChange = evt => { const passwordValue = evt.target.value.trim(); setPassword(passwordValue); }; const handleSubmit = () => { dispatch('submit(email, password)'); setIsLoginDisabled(true); }; return { emailField: { onBlur: handleEmailBlur, value: email, }, passwordField: { onChange: handlePasswordChange, value: password, }, submitBtn: { onClick: handleSubmit, disabled: isLoginDisabled, }, }; }; export default function Login(props) { const { emailField, passwordField, submitBtn } = useLoginElements(props); return ( <form> <input type="email" placeholder="email" className="mx-auto my-2" onBlur={emailField.onBlur} /> <input type="password" className="my-2" {...passwordField} /> <input type="button" className="btn btn-primary" value="Submit" {...submitBtn} /> </form> ); 这将会解决不可控组件的问题,我们甚至可以通过自定义 hook 中的 value 属性(在 emailField 元素中)导出 email state,然后,在组件中,我们可以放弃那些不需要的属性,就像上面的示例一样只用那些必要的属性。上面的示例中我们只用到了来自 emailField 的 onBlur 方法。现在,我们可以把所有方法作为属性暴露出来,然后测试它们,其实,我们并不一定真正的用到它们。
-
测试自定义 hook
现在,为了测试自定义 hook,我们把它引入到一个函数组件中,如果,我们不这么做,hook 将无法测试,这是因为 hooks 设计之初就只能在函数组件中使用。然后,我们期望自定义 hook 可以在函数组件中正常工作。
describe('useLoginElements', () => { const Elements = () => { const props = useLoginElements({}); return <div {...props} />; }; // since hooks can only be used inside a function component we wrap it inside one const container = shallow(<Elements />); it('should have proper props for email field', () => { expect(container.prop('emailField')).toEqual({ value: '', onBlur: expect.any(Function), }); }); it('should set value on email onBlur event', () => { container.prop('emailField').onBlur({ target: { value: 'newemail@gmail.com', }, }); expect(container.prop('emailField').value).toEqual('newemail@gmail.com'); }); it('should have proper props for password field', () => { /* Check onChange and value props */ }); /* check other functional behavior of the component */ }); describe('<Login/>', () => { const container = shallow(<Login />); it('should match the snapshot', () => { expect(container.html()).toMatchSnapshot(); }); /* Test for other ui aspects of the page and not the functional behavior of the component */ }); 最后,在 Login 组件中,我们只需测试 UI,并不要关心其中的方法和行为。这样,我们就可以把 App 的行为和 UI 分开。
-
总结
对于hooks组件,与state无关的函数抽离到组件外部进行测试,与state相关的函数通过事件去触发,然后测试dom上的结果与期望是否相同。
-
6.4 测试生命周期
-
类组件
it('calls componentDidMount', () => { const componentDidMountSpy = jest.spyOn(TodoList.prototype, 'componentDidMount'); const wrapper = shallow(<Test />); expect(componentDidMountSpy).toHaveBeenCalled(); componentDidMountSpy.mockRestore(); }); 使用spyOn来mock 组件的componentDidMount,替身函数要在组件渲染之前,所有替身函数要定义在setup执行之前,并且在判断以后要对替身函数restore,不然这个替身函数会一直存在,且被mock的那个函数无法被再次mock。
-
hooks组件
在使用 shallow 渲染组件时,useEffect 这种生命周期相关 hooks 还不支持 (这些 hooks 不会被调用),因此,我们需要用 mount 代替。就像 useState 一样,我们可以模式事件或者作为属性方法来执行,然后检测 props 是否有更新来验证 hooks 是否正确。
describe('<Login /> test effect hooks', () => {
  const container = mount(<Login />);

  it('should have the login disabled by default', () => {
    expect(
      container.find('input[type="button"]').prop('disabled'),
    ).toBeTruthy();
  });

  it('should have the login enabled with valid values', () => {
    container.find('input[type="password"]').simulate('change', {
      target: {
        value: 'validpassword',
      },
    });
    expect(container.find('input[type="button"]').prop('disabled')).toBeFalsy();
  });

  it('should have the login disabled with invalid values', () => {
    container.find('input[type="email"]').simulate('blur', { /* */ });
    expect(
      container.find('input[type="button"]').prop('disabled'),
    ).toBeTruthy();
  });
});
有关 Enzyme 支持的生命周期 hooks 详情可以看这里。
6.5 测试Promise
// 使用'.resolves'来测试promise成功时返回的值
it('works with resolves', () => {
   // expect.assertions(1);
   expect(user.getUserName(5)).resolves.toEqual('haha')
});

// 使用'.rejects'来测试promise失败时返回的值
it('works with rejects', () => {
  expect.assertions(1);
  return expect(user.getUserName(3)).rejects.toEqual({
    error: 'User with 3 not found.',
  });
});

// 使用promise的返回值来进行测试
it('test resolve with promise', () => {
  expect.assertions(1);
  return user.getUserName(4).then((data) => {
    expect(data).toEqual('hehe');
  });
});
it('test error with promise', () => {
  expect.assertions(1);
  return user.getUserName(2).catch((e) => {
    expect(e).toEqual({
      error: 'User with 2 not found.',
    });
  });
});
当对Promise进行测试时,一定要在断言之前加一个return,不然没有等到Promise的返回,测试函数就会结束。可以使用.promises/.rejects对返回的值进行获取,或者使用then/catch方法进行判断。
6.6 测试async/await
// 使用async/await来测试resolve
it('works resolve with async/await', async () => {
  expect.assertions(1);
  const data = await user.getUserName(4);
  expect(data).toEqual('hehe');
});

// 使用async/await来测试reject
it('works reject with async/await', async () => {
  expect.assertions(1);
  try {
    await user.getUserName(1);
  } catch (e) {
    expect(e).toEqual({
      error: 'User with 1 not found.',
    });
  }
});
使用async不用进行return返回,但是要使用try/catch来对异常进行捕获。
6.7 测试redux
-
modal代码
export default { namespace: "example", state: { value: "" }, effects: { * fetch({ payload }, { call, put }) { const data = payload * 2; yield put({ type: "save", payload: data }); } }, reducers: { save(state, action) { return { ...state, value: action.payload }; } } }; -
测试
import expect from "expect";
import { effects } from "dva/saga";
import example from "../../../src/models/example";

describe("example Model", () => {
  it("loads", () => {
    expect(example).toBeDefined();
  });
  describe("state", () => {
    it("case: value", () => {
      const state = example.state;
      expect(state.value).toBe("");
    });
  });

  describe("reducers", () => {
    it("case: save should work", () => {
      const reducers = example.reducers;
      const reducer = reducers.save;
      const state = {
        value: ""
      };
      expect(reducer(state, { payload: "message" })).toEqual({
        value: "message"
      });
    });
  });

  describe("effects", () => {
    it("fetch should work", () => {
      const { call, put } = effects;
      const sagas = example.effects;
      const saga = sagas.fetch;
      const generator = saga({ type: "example/fetch", payload: 111 }, { call, put });
      const next = generator.next();
      expect(next.value).toEqual(put({ type: "save", payload: 222 }));
    });
  });
});
7. 测试覆盖率
代码覆盖率是一个测试指标,用来描述测试用例的代码是否都被执行。统计代码覆盖率一般要借助代码覆盖工具,Jest集成了Istanbul这个代码覆盖工具。
7.1 四个测量维度
- 行覆盖率(line coverage):是否测试用例的每一行都执行了
- 函数覆盖率(function coverage):师傅测试用例的每一个函数都调用了
- 分支覆盖率(branch coverage):是否测试用例的每个if代码块都执行了
- 语句覆盖率(statement coverage):是否测试用例的每个语句都执行了
在四个维度中,如果代码书写的很规范,行覆盖率和语句覆盖率应该是一样的。会触发分支覆盖率的情况有很多种,主要有以下几种:
- ||,&&,?,!
- if语句
- switch语句
7.2 设置阈值
在Jest中,可以通过coverageThreshold这个配置项来设置不同测试维度的覆盖率阈值。global是全局配置,默认所有的测试用例都要满足这个配置才能通过测试。还支持通配符模式或者路径配置,如果存在这些配置,那么匹配到的文件的覆盖率将从全局覆盖率的计算中去除,独立使用各自设置的阈值。
{
  ...
  "jest": {
    "coverageThreshold": {
      "global": {
        "branches": 50,
        "functions": 50,
        "lines": 50,
        "statements": 50
      },
      "./src/components/": {
        "branches": 40,
        "statements": 40
      },
      "./src/reducers/**/*.js": {
        "statements": 90,
      },
      "./src/api/very-important-module.js": {
        "branches": 100,
        "functions": 100,
        "lines": 100,
        "statements": 100
      }
    }
  }
}
8. 集成到脚手架
在项目中引用单元测试后,希望每次修改需要测试的文件时,能在提交代码前自动跑一边测试用例,保证代码的正确性和健壮性。
在项目中可以使用husky,用来触发git的hooks,做一些代码提交前的校验。在项目中安装husky以后,会在 .git/hooks 中写入 pre-commit 等脚本激活钩子,在 Git 进行相关操作时触发。
"husky": {
  "hooks": {
    "pre-commit": "npm run test"
  }
},